It’s simple to do. Really. Don’t let a little wiring scare you.
I’m 100% self-taught DIY’er with no formal training in electrical work and it took me 3 hours once I received all the materials.
At its simplest level you’re converting your 12 volt system to an 18 volt system by adding another 6 volts. 18 volts is the max it can handle and all the power you need. 24 volt systems are out there but they are too much for the gears too handle.
It will go twice as fast as it does today. It will tackle your uphill driveway at 5 MPH with two 6 year olds and a payload of rocks, dirt, and sticks. It will give your child a huge smile every time they get on. Ours started to lose interest in it when he turned 5. After the upgrade he gets crazy excited every time we talk about it. I don’t see it slowing down now that he’s 7. It’s like his own ATV.
Let’s get right to it!
We'll use a John Deere Peg Perego in this example, this can be done for most power wheels or ride on electric vehicles
Charge Batteries
Charge all batteries to 100%. You need another 6 volt to add speed. Two 6v and a 12v to add speed and double the battery life.
The 12 volt battery here and 6 volt battery here are identically rated to the manufacturers battery. And cost substantially less with tons of 4+ star ratings on Amazon.
If you are looking for a charger this is a good one that can charge both 6v and 12v.
Click on images to enlarge, specs, details
Battery layout
Remove the current battery and remove the blue plastic battery housing/harness. You’ll be left with three pieces: 1) battery with two terminals exposed 2) harness 3) one blue housing
Now that you have the manufacturer’s battery removed you can lay it out with the new batteries in the layout you will install it.
We've included a diagram below how it should be laid out
Note that a parallel connection maintains voltage (speed) and doubles the ah (distance/run time). Connection in a series doubles the voltage (speed) and maintains the ah (distance/run time).
The beauty of this layout; it uses both a series and parallel connection to double both the speed and distance!
The 12 volt batteries will be connected in parallel as will the 6 volt batteries. Then, the 6 volt batteries will be connected to the 12 volt batteries in a series
Prep your wire connections in this step using your wire strippers and add 3 Alligator clip connectors

Install batteries
The batteries will be placed in the front of the vehicle near the gas pedal. Make the connections with your wire for the 6 volt batteries first. The positive wire will connect directly to the Gator harness with an Alligator clip connector
One of the 12 volt batteries will be placed in the original battery box and one of them will be placed above the gas pedal. Make the 12 volt parallel connections with short wire threaded through the circle opening in the original battery box to the second 12 volt battery. The positive terminal on the battery near the gas pedal will connect to the negative wire ran from the 6 volt batteries with two Alligator clip connectors for charging (detail on charging later). The negative terminal on the battery in the original battery box will connect directly to the harness so leave partially exposed. All other terminals and connections should be made at this point with electrical tape to secure connections.
To test first place step stool under the rear of the vehicle to prop up the back wheels. Make connections including alligator clips and press gas pedal for response.
Once tested use bungy cord to secure batteries near gas pedal.
Charge after use
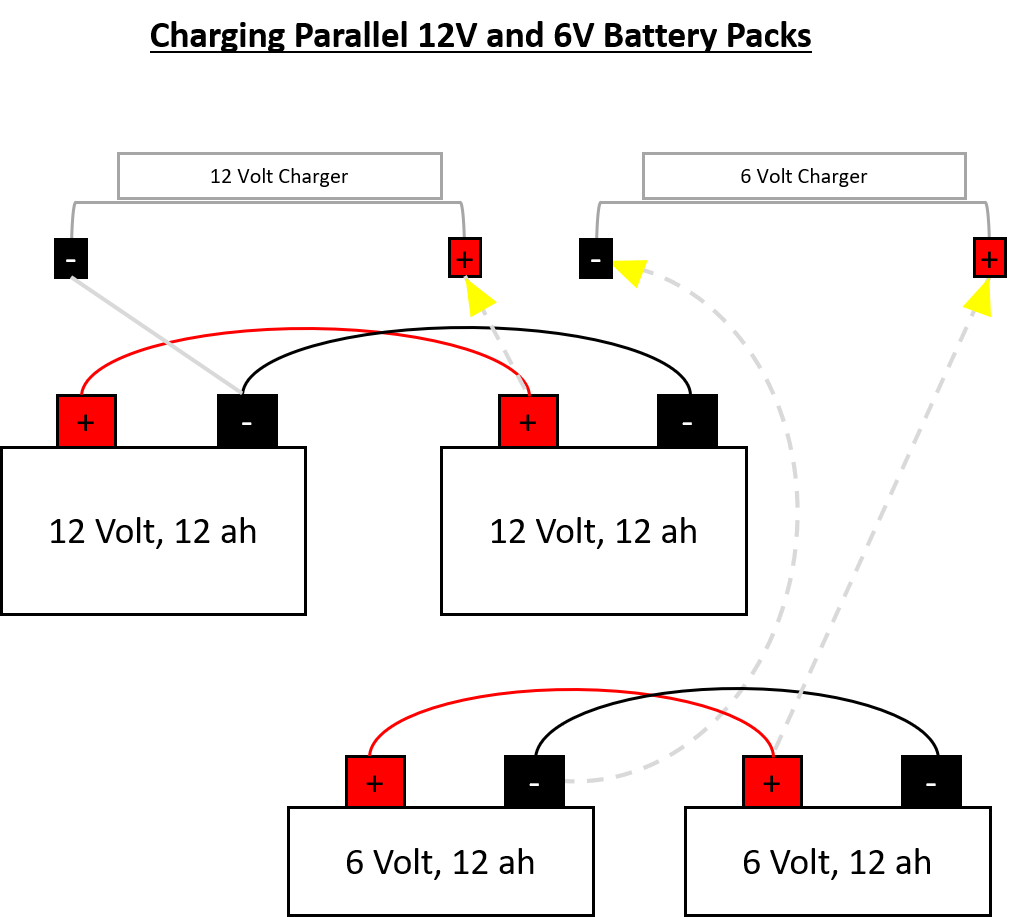
Using the wiring in place and Alligator clip connectors charging can be done easily. Disconnect all alligator clips and disconnect Deer wire harness from batteries.
For 12 volt batteries, open original battery box and connect negative clip of 12 volt battery charger directly to negative terminal. Disconnect Alligator clips from 12 volt battery near gas pedal, and connect positive clip from 12 volt battery charger to Alligator clip.
For 6 volt batteries, open original battery box and connect positive Alligator clip (previously connected to wire harness) to positive clip on 6 volt battery charger. Connect negative Alligator clip that was previously connected to 12 volt battery near gas pedal to negative clip on 6 volt battery charger

If you only want the vehicle to go faster, not last longer, simplify your setup as below
This option requires only 1 additional 6 Volt battery to be placed near the gas pedal in the front of the Gator. By connecting the original 12 volt battery and the new 6 volt battery in a series the Gator will run faster, same run time. Each battery should be charged individually.
If you only want the vehicle to last longer, not faster, simplify your setup as below
This option requires only 1 additional 12 Volt battery to be placed near the gas pedal in the front of the Gator. By connecting the original 12 volt battery and the new 12 volt battery in parallel the Gator will run 2x as long, same speed. The parallel batteries can be charged together.
For this project you will need:
Two 6 volt batteries
Match manufacturers AH (amp hours) as close as possible so it lasts
One additional 12 volt battery
Match your manufacturer battery volts and ah (amp hours)
10 gauge wire
Alligator clip connectors
Electrical tape
Battery charger
Has a switch to charge both 6 and 12 volt that you will need. Old charger is only 12 volt
Two bungy cords
Tools you will need
Wire cutter/stripper
Flathead screwdriver


