This simple DIY idea brings the best of a maker space into your home.
It give your kids a place to learn through play every day.
Anybody can make it.
Most are familiar with the maker space concept. It’s a pretty simple idea where children use their creativity to create things in a collaborative work space. It introduces kids to 21st century skills in science, technology, engineering, and math (STEM) through hands on learning and critical thinking skills at an early age. Many early education centers and schools are integrating maker space time into their curriculum.
A maker space isn’t specifically defined by a set of tools our resources. At an early age one of the best maker space concepts is a lego board and a pile of lego blocks for kids to design buildings, build farms, and make vehicles. There are no limits to what a kid can dream up with a set of blocks and a lego board in the home.
Even better maker space tools are Magna tiles. It’s amazing how long these can capture kids attention and drive creative learning through hands on, fast paced design. Magna tile structures can be put together in a matter of minutes and kids can play for hours a day. They are the ultimate maker space tool in the home.
With legos and magna tiles it’s easy to see why this hands on creative learning will stimulate their development at an early age.
Stage materials
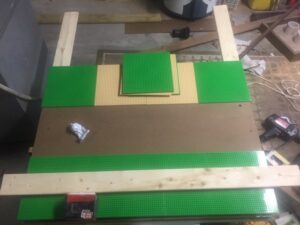
- Lay out your materials, tools, and lego boards in one place where you will be working. Use clamps to stage
- If you need a reco we used these lego boards and these magna tiles

Assemble
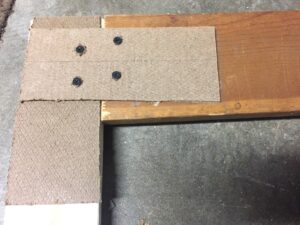
- Take a wood 1x4, cut into four pieces to make your stand and screw to a sheet of hardboard tempered panel.
- Sink screws flush. You will be laying your lego boards and sheet metal on top of the screws. Repeat for 2nd side
- Have the hardware store cut this before you bring it home. You need 2 pieces. Most HomeDepot locations have onsite cutting free of charge. Take advantage of that service. The board is large and easier to transport after cut.

Hinge and stand
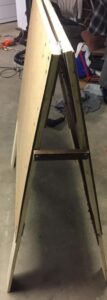
- Lay both stand ends face down. Leave space required for the hinge, and screw hinges to both sides. Once complete fold and stand up
- Use a scrap piece of 1x4 for piece shown. Cut in half (approx. 1.75 in) with a distance of 5 inches. Drill hole with 3/8 drill bit and assemble screws

Glue
- Start with the lego side, lay your lego boards down in the design you’d like. It’s very important to lay boards flush so all boards meet on corners. Once desired layout is achieved hold your boards in place with clamps or heavy materials
- Glue one board at a time, apply glue generously, removing extra glue that pushes out with towel
- Once applied lay flat and allow to dry for 24 hours
- Next center sheet metal on opposite side. Ensure that there is no more than 3.5” of space around your sheet metal, as that is where the wood frame will cover. Once desired layout is achieved apply glue generously.
- Once applied lay flat and allow to dry for 24 hours
- Using 4 wood pieces per side, screw them around sheet metal, and you're done!

You will need:
- Wood 1x4
- Hardboard tempered panel
- 2 hinges
- Screws
- Sheet metal
- Lego Boards
- Legos
- Magna tiles
- Strong adhesive
Tools you will need
- Circular saw, table saw, or jigsaw
- Drill with phillips head drill bit
- Measuring tape
- Pencil for marking wood
